Wednesday, June 3, 2015

Candy Buttons

I have tried several copycat recipes for those delicious little candy buttons, and this one, by far, comes closest to the originals.  

I used this recipe from Sandy Toes & Popsicles and modified it slightly as you will see below.
 What you'll need:
- 1/4 teaspoon of lemon juice
- 2 1/2 cups of confectioner's sugar
- 2 tablespoons of meringue powder
- Water to thin out icing if needed (I ended up using just over 1/4 cup)
- Food coloring
- Pastry bags
- Non-toxic paper

First you'll want to cut you paper into strips that are 2 3/4 inches wide and set them aside so they are handy when you need them.

Next you'll have to mix the icing together.  In a Kitchen Aid mixer (or any other stand mixer) combine the lemon juice, confectioner's sugar, meringue powder, and water (if you choose to use it).  Whip it for 8-10 minutes until it is the consistency of sour cream (this was a great tip from Sandy Toes & Popsicles).


Once you are done mixing the ingredients separate them into as many smaller bowls as you have colors.

I chose to use the primary colors (red, blue, and yellow) and then made a green and purple by mixing colors.

Once you are satisfied with your colors and the constancy of your icing, you can still add a few drops of water at this point if necessary, put the icing into pastry bags or any ziplock bags.

Cut a small slit into the point of your pastry bag (or into one of the corners of your ziplock bag if that's what you are using)


At this point you should spread out your strips of paper that you cut out in the first step.

Then squeeze out small dots of icing onto your paper.

I chose to do sections of 4 x 4 for each color (though some did only end up with three rows by mistake.)


And voila there you have it, your very own candy buttons!

In the photo above you can see that the buttons were not perfectly smooth, but in my experience the icing did smooth out over time as they hardened.

Enjoy :)

Tuesday, May 5, 2015

Popcorn with Truffle Sea Salt


 Ok, so today's recipe isn't necessarily a new or unique idea, and it surely isn't a complicated recipe, but let me tell you it is amazing and I just had to share!
Air popped popcorn has gotten a lot of attention for being a healthy alternative to store bought microwave popcorn or poppers that use oil.  They make air pop popcorn poppers (try saying that one 5 times fast :) ) but what I like to do is make mine in the microwave.

Depending on how much popcorn you want, take between 1/4 - 1/2 cups of un-popped kernels an put them in a brown paper bag and seal it shut with a piece of scotch tape.  There is no oil or butter required.
Just before putting the bag into the microwave I like to shake the bag back and forth, a shimmy if you will, to even out the kernels on the bottom of the bag.  How long to cook the popcorn always depends on how much popcorn you have and how powerful your microwave is.  I usually depend on the "popcorn" button on the front of my microwave (mine is for 1 minute and 55 seconds).  A good tell tale sign of when your popcorn is done, even if the timer hasn't gone off yet, is when you can count two seconds between pops (you can use this rule of thumb for all microwave popcorn).  Doing this will likely ensure that none of your popcorn ends up burnt.
Once your popcorn is done you can put any of your favorite toppings on top.  My usual choice is butter, a little bit of salt, and M&Ms, but I have a bunch of delicious combinations that I will post over time.

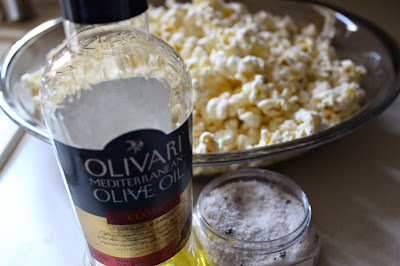
This topping is new to me, I just discovered it this week - olive oil and truffle salt.

Over the past year I have fallen in love with Saratoga Olive Oils and vinegars.  While I was in their shop in Burlington, VT  I started looking at all of their sea salts and need up buying the Truffle Sea Salt.  I've never used truffle salt or truffle oil before, but part of what makes the Saratoga Olive Oil Company so great is that they have recipes for all of their products on their website, and sometime customers post in the comments what they use them for.  One of the suggestions in the comments for the truffle sea salt was to put it on popcorn, which is perfect seeing as I LOVE  popcorn!!
So I drizzled a little bit of olive oil over my bowl of popcorn (it probably ended up being 1.5 teaspoons).  Then I sprinkled a pinch of the truffle sea salt over it.

Be warned that this salt is strong and a little bit goes a long way.  But this combination is light and simultaneously adds a fantastic flavor to your snack.  I definitely recommend it!

Thursday, April 23, 2015

Easter Cake!

Easter is generally a double celebration in our house.  We have our regular easter dinner, but we always include cake or cupcakes on our desert menu, because a couple of family members' birthdays usually fall within a week or so of easter.  This year, I decided to put my Pinterest addiction to good use and found an adorable, and easy cake to make.  I found this cake on Cake Central and thought it was delightful.  I changed a couple things, like not including the M&Ms on the bottom (honestly I was in a rush while decorating and missed this little detail :) ).  This recipe was perfect, because the Peeps fit around the cake perfectly alternating in color.  The OCD in me would have been going nuts if I had to double up on one color.  What else I loved about this design is it accommodates all cake and frosting flavor preferences so you can customize it to you and your guests' tastes.


Thank you for reading my first blog.  This post was more of an after thought, and a test run for blogging.  I promise ones inn the future will be better planned with more photos and original ideas.

Hope y'all are having a wonderful day!